Materials in Iray for 3ds Max are integrated directly in the 3ds Max Slate and Compact Material Editors, with a large,
high quality library of example materials to give you a reference point to create virtually any material. If you prefer
to start from scratch, Iray+ base components give total freedom over material creation.
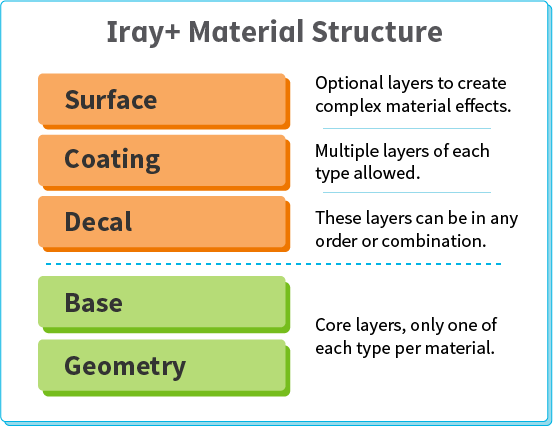
Material structure in Iray+
✱ Note: for accurate materials in Iray, please ensure that
the Use Real-World Texture Coordinates checkbox is ticked on the
Customize > Preferences… > General tab.
Iray in the Material Editor
When you use or create a new Iray+ material, you have the ability to add optional Decal, Coating, and Surface layers to
the Base and Geometry layers.
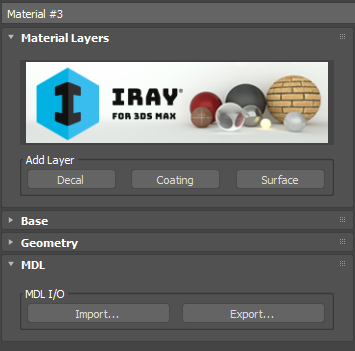
You can add these layers in the Material Detail panel in any combination or number. You can move each layer up or down in the material’s
structure, or delete it, as required:
To import MDL materials from other MDL-enabled applications or to export Iray+ materials for use externally,
see Using MDL.
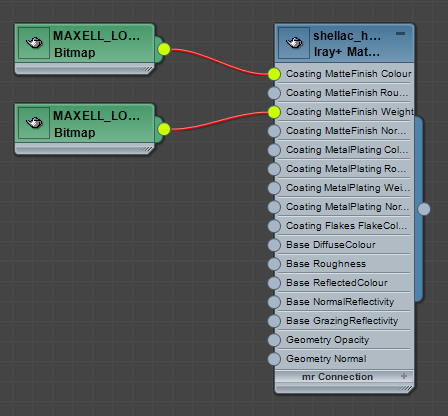
In the Slate Material Editor, Iray+ Materials show each layer and its available map locations as input sockets:
As you add or remove layers, the material nodes will update.
View more information on using the Slate Material Editor’s material nodes
here.
Using an existing material
The quickest way to get started with materials in Iray for 3ds Max is by choosing an example from the supplied Iray+
Materials Library. You can then adapt this to suit your own requirements.
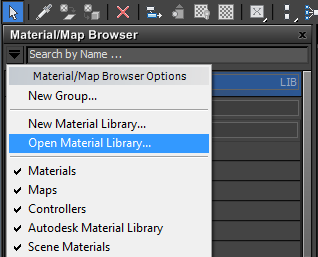
If the LwIrayPlusMaterials.mat library is not loaded in the 3ds Max Material Editor, click the dropdown arrow at the
top of the Material/Map Browser and choose Open Material Library...
Navigate to C:\Program Files\Autodesk\3dsMax20**\materiallibraries*
and choose the LwIrayPlusMaterials.mat file.
Inside you'll find a selection of example materials to use and adapt.
Creating a new material
When creating a material from scratch, you'll start by basing it on one of the supplied
Iray+ Material Components.
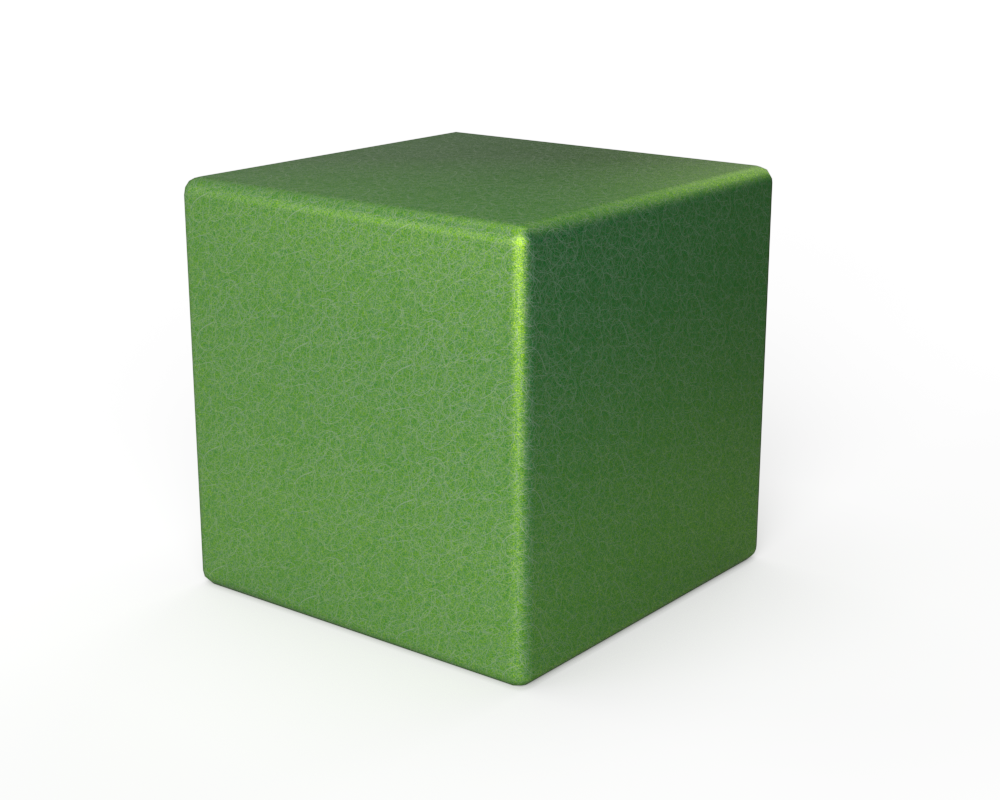
Example
In this example we will work with an Iray+ Material
component to create a multi-layered car paint.
Create a simple studio environment and add a 10m³ object such as a ChamferBox.
Apply a UVW map modifier and set Box as the mapping type.
Open an ActiveShade Mode window to view the changes to materials as you add layers.
In the 3ds Max Material Editor, from the Material/Map Browser, choose Materials > Iray+ > Iray+ Material,
and apply this to the object that you created. Select the following parameters to create the basis of the material:
Base
Base Preset: Matte
Colour: RGB 0, 35, 4
Roughness: 0.05
To add some paint flakes, select a Coating layer from Iray+ Material > Coating and apply the
following parameters:
Coating Preset: Flakes
FlakeColour: RGB 124, 251, 0
FlakeRoughness: 0.2
Weight: 0.15
FlakeSize: 0.05
FlakeAmount: 0.5
FlakeBumpiness: 0.5
Next, add some finish to the material, with another Coating layer from
Iray+ Material > Coating and apply the following parameters:
Coating Preset: ClearCoat (Remove the Iray+ Perlin Noise map attached to the Normal parameter.)
DiffuseColour: RGB 7, 10, 28
Roughness: 0.2
ReflectedColour: RGB 255, 255, 255
Exponent: 4.0
NormalReflectivity: 0.2
GrazingReflectivity: 1.0
UseIOR: Off
Weight: 1.0
Finally, add a Surface layer from Iray+ Material > Surface and apply the
RadialScratches2 preset.
You should now have a material similar to the one shown above.
* If you are using 3ds Max 2024, navigate to: C:\Program Files\Autodesk\3dsMax2024\materiallibraries;
if you are using 3ds Max 2025, navigate to C:\Program Files\Autodesk\3dsMax2025\materiallibraries, etc.