To add an Iray+ Light to your scene, from the dropdown on the Tool panel under Create > Lights,
select Iray+. On the Object Type rollout, select Light:
➤
➤
➤
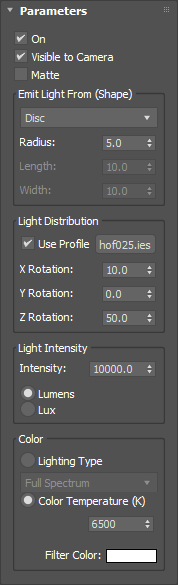
Parameters
On: toggles the light on or off without removing the geometry from the scene.
Visible to Camera: specifies whether the camera can see the light source geometry. If the light is
On but Visible to Camera is unticked, with the
Iray+ renderer the light will only be made invisible to
primary eye rays, i.e. when viewed directly from the camera. However, such a light will still be visible in reflections
or through transparent materials, and it will still cast shadows. When using the
Iray+ Interactive renderer, such a light will be
invisible even in reflections or refractions.
Matte: controls whether or not the light directly illuminates
matte objects in the
scene. Enable this when creating lights that correspond to lights visible in the backplate to which you are matching.
These will not be visible to the camera and will not illuminate matte objects directly, but they will still illuminate
other objects in the scene.
✱ Note: the Matte parameter is only supported by the
Iray+ renderer.
Emit Light From (Shape):
Dropdown: choose different light shapes:
Disc
Rectangle
Sphere
Cylinder
Radius: sets the size of the light shape for Disc, Sphere, and Cylinder lights.
Length: sets the length of the light shape for Rectangle and Cylinder lights.
Width: sets the width of Rectangle lights.
Light Distribution:
Use Profile: toggles the photometric profile on or off. (Does not turn off the light.)
Map: browse your file system to locate a photometric profile.
X Rotation/Y Rotation/Z Rotation: transforms the photometric light distribution relative to the light
source geometry. Use the 3ds Max transforms in the viewport to transform the light geometry and profile together.
Light Intensity:
Intensity: controls the intensity of the light, measured in Lumens or Lux:
Lumens: the total amount of light emitted is independent of the size of the light source geometry.
Increasing the surface area will mean each that part of the surface becomes dimmer, so that overall emission remains constant.
Lux: the total amount of light emitted is proportional to the surface area of the light source geometry.
(This is based on Power per Unit Area.) Increasing the surface area will mean that more light enters the scene.
Color:
Lighting Type: select the color temperature from a dropdown list of preset lighting types, each with
the corresponding Kelvin value:
Full Spectrum
D50 Horizon light (5003k)
D55 Mid-morning/afternoon daylight (5503k)
D65 Noon daylight (6504k)
D75 North sky daylight (7504k)
F1 Daylight Fluorescent (6430k)
F2 Cool White Fluorescent (4230k)
F3 White Fluorescent (3450k)
F4 Warm White Fluorescent (2940k)
F5 Daylight Fluorescent (6350k)
F6 Light White Fluorescent (4150k)
A Incandescent/Tungsten (2856k)
Phosphor Mercury (6800k)
Xenon (6400k
Mercury (4000k)
Quartz (3350k)
Halogen (3000k)
High Pressure Sodium (2200k)
Color Temperature (K): specifies color temperature in Kelvin.
Filter Color: places a colored gel in front of your light source. Using a 0k or Full Spectrum value
shows the chosen tint exactly. Using a different color temperature gives accurate mixing between the tint and the light color.